[New] Voxels Hollowing 3D: We Made Hollowing Way Better
Hollowing was okay. Now it works better. Regular hollowing saves resin, lightens your models, speeds up prints. But it has blind spots: You cannot see resin traps until after printing. Suction cups surprise you mid-print. You spend time manually checking and still miss things.
Voxels Hollowing 3D fixes all that.
How to Access Voxels Hollowing 3D
Getting started is simple. The feature is accessible directly from the main interface:
1. In Lychee Slicer, open the Prepare tab in the top toolbar
2. Look in the right panel for the hollowing tools section
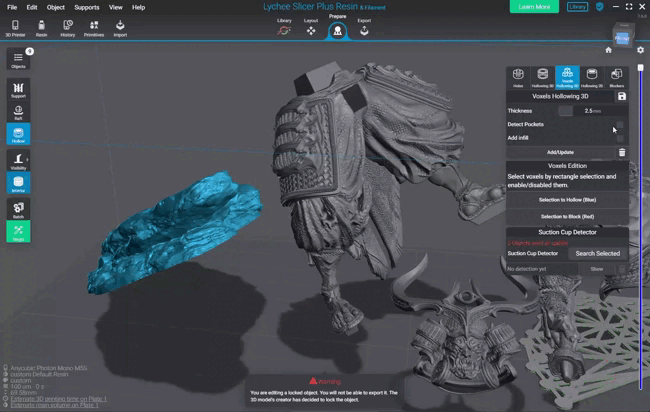
3. Click Voxels Hollowing 3D to open the feature panel
Once open, the panel displays all available options: Thickness settings - Automatic detection features (Detect Pockets, Suction Cup Detector) - Auto Fill options - Voxel editing tools - Infill configuration.
Step-by-step: Our Recommended Workflow
Follow these steps for optimal results:
1. Set the thickness - Choose appropriate wall thickness (default: 2.5mm)
2. Enable Detect Pockets - Let the system identify potential resin traps
3. Run Suction Cup Detector - Check for suction cup issues
4. Review and adjust - Use voxel selection tools to manually refine if needed
5. Configure infill (optional) - Add internal supports for larger models
6. Click Add/Update - Apply the hollowing settings
Get Started Today
Already Using Lychee Slicer Plus? Update to the latest version → Load your model → Prepare tab → Voxels Hollowing 3D → Follow the recommended workflow
Using Lychee Slicer Lite? Download → Activate free trial in the app → Load and orientate a model → Access Voxels Hollowing 3D from the Prepare tab
Voxels Hollowing 3D: Main Settings
- Thickness: How Thick Are Your Walls?
This controls how thick the walls of your hollowed model will be, measured in millimeters. Default: 2.5mm works great for most prints. Think of it like this:
- 1.5 to 2mm: Thinner walls, like a plastic cup. Good for small decorative pieces and miniatures. Saves more resin but more fragile.
- 2.5mm: Medium walls, like a food container. Works for most things.
- 3 to 4mm: Thicker walls, like a sturdy bottle. Use for parts that need to be strong or handle stress.
- Detect Pockets: Find Hidden Resin Traps
Turn this on to automatically find problem areas where resin could get trapped inside your model. What's a resin trap? Imagine hollowing out a bottle but forgetting to make a hole at the bottom. Liquid resin gets stuck inside with no way to drain out. It stays wet forever and can ruin your print.
When you enable Detect Pockets, these problem areas light up in the voxel view so you can see them and fix them before printing. Always turn this on. It saves you from discovering trapped resin after your print is done.
- Add Infill: Add Support Inside
This adds support pillars inside your hollow model, like the internal structure of a building. When do you need this?
- Large hollow models that might collapse or warp
- Parts that need extra strength
- Models with big hollow sections
When enabled, set the Interval (spacing between pillars): 10mm: Good starting point for most models. Most small models don't need this. It's mainly for big or functional parts.
Voxels Edition
The Voxels Edition section lets you manually control exactly which parts of your model get hollowed and which parts stay solid. Think of it like painting on your model to tell it what to do. Most people don't need to use this. The automatic detection handles most situations. But if you want precise control, these tools are here.
- Selection to Hollow (Blue)
Use rectangle selection to mark areas you want to hollow out. Selected areas turn blue, showing they will be removed. When to use this: You want to hollow a specific area the automatic system missed ; You're creating a custom hollow design ; You want more control over exactly what gets removed.
- Selection to Block (Red)
Use rectangle selection to mark voxels that should remain solid (not hollowed). Selected areas will be displayed in red, indicating they will be preserved as solid material. This is particularly useful for filling in detected resin traps or reinforcing specific areas of your model.
Suction Cup Detector
The Suction Cup Detector finds areas that could create a vacuum effect during printing, which is one of the most common causes of print failures. What's a suction cup effect?
Imagine sticking a suction cup on a window. It creates a vacuum seal that's hard to pull off. The same thing can happen during resin printing between your hollow model and the build plate (or the FEP film at the bottom of your resin vat).
Why is this bad? When each layer tries to separate from the FEP film, the vacuum creates enormous pulling force. This can: rip your print off the build plate, crack or delaminate your model or damage your printer's FEP film.
How to use it: Click Search Selected to scan your model. If problems are found, you'll see a notification like "1 Object needs an update". The problem areas are identified automatically. You can then review and address these issues before finalizing your hollowing.
Automatic Fill Options: One Click Fixes
Voxels Hollowing 3D includes two powerful automatic options that fix common hollowing problems with one click. Turn both of these on. They save you from the most common print failures.
- Auto Fill Interior Resin Traps
Just turn it on. It handles the problem automatically so you don't have to think about it. Automatically fills interior pockets that would trap uncured resin inside your model.
The problem: Sometimes hollowing creates enclosed spaces with no way for liquid resin to drain out. It's like a sealed bubble inside your model. The resin stays liquid forever, sloshing around inside and potentially leaking out later.
The solution: Enable this option and the system ensures all interior cavities are either: Properly connected to drainage holes, OR Filled solid so there's no trapped space.
- Auto Fill Interior Suction Cups
Just turn it on. Works together with the Suction Cup Detector to automatically prevent one of the most common causes of print failure. Automatically fills areas below detected suction cups to prevent vacuum failures.
The problem: Suction cup zones create vacuum effects that can rip your print off the build plate or crack your model during printing.
The solution: When enabled, the algorithm: Identifies suction cup zones (after you run Suction Cup Detector), OR Fills the hollow space beneath them strategically, OR Prevents vacuum related print failures
Tips and Best Practices
- Always run the Suction Cup Detector before finalizing your hollowing, especially for models with complex geometry
- For miniatures and detailed models, consider using a smaller wall thickness (1.5 to 2mm) to reduce weight and resin usage
- For functional parts or models that need to withstand stress, use thicker walls (3 to 4mm) and consider adding infill
- Use the voxel selection tools to reinforce thin areas or features that might break during post processing
- Remember to add drainage holes to your model (using the Holes tool) to allow uncured resin to escape